Configuring Ascendis Caller ID With Multiple Phone Lines
For an overview of using Ascendis Caller ID with multiple phone lines, see
Using Ascendis Caller ID With Multiple Phone Lines.
Configurations
|
Single Server with Modems
|
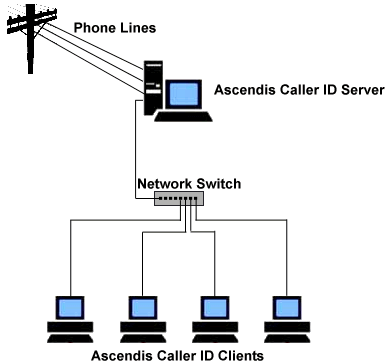
Ascendis Caller ID Configuration:
- Server
- Open the Options window in Ascendis Caller ID
- Click the Devices tab
- Enable all the devices (modems) connected to the phone lines
- Click the Network tab
- Enable "Offer Ascendis Caller ID information on network (be a server)"
- Write down the value for "Server IP address" for use when configuring the clients
- Click the "OK" button to save the changes
- Clients (configure each client)
- Open the Options window in Ascendis Caller ID
- Click the Network tab
- Enable "Get calls from Ascendis Caller ID server on network (be a client)"
- In the "Server address" box, enter the "Server IP address" you wrote down for the server
- Click the "OK" button to save the changes
|
|
|
|
Single Server with Whozz Calling? Device
|
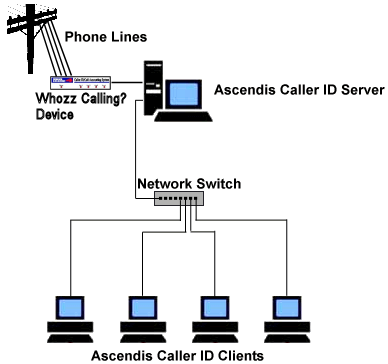
Ascendis Caller ID Configuration:
- Server
- Open the Options window in Ascendis Caller ID
- Click the Devices tab
- Click the "Whozz Calling?" tab
- Click "Enable Whozz Calling? device" checkbox
- Select the serial port to which the Whozz Calling? device is connected
- Specify the number of phone lines connected to the Whozz Calling? device
- Click the Network tab
- Enable "Offer Ascendis Caller ID information on network (be a server)"
- Write down the value for "Server IP address" for use when configuring the clients
- Click the "OK" button to save the changes
- Clients (configure each client)
- Open the Options window in Ascendis Caller ID
- Click the Network tab
- Enable "Get calls from Ascendis Caller ID server on network (be a client)"
- In the "Server address" box, enter the "Server IP address" you wrote down for the server
- Click the "OK" button to save the changes
|
|
|