|
Options (Notification) Location: View Menu -> Options |
Top Previous Next Contents Index |
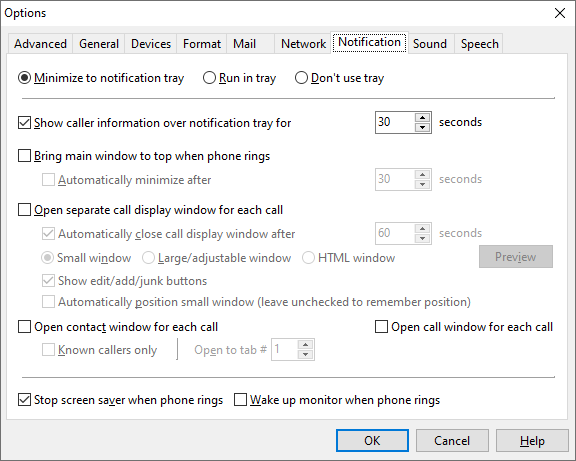
The Notification page of the Options window lets you determine how Ascendis Caller ID notifies you visually about incoming calls.
The settings are:
Minimize to notification tray |
Causes Ascendis Caller ID to place an icon in the notification tray when minimized. The Ascendis Caller ID program will also disappear from the task bar. This keeps Caller ID out of the way until needed. |
||
Run in tray |
Causes Ascendis Caller ID to place an icon in the notification tray the entire time it is running. The Ascendis Caller ID program will also disappear from the task bar. This keeps Ascendis Caller ID out of the way at all times. |
||
Don't use tray |
Causes Ascendis Caller ID to run as a standard Windows program, with a button on the task bar and no icons in the notification tray. |
||
|
|
||
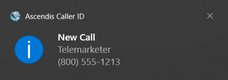
Show caller information over notification tray for n seconds |
Causes Ascendis Caller ID to display a notification above the Windows notification tray. In Windows 10, this should look something like Sometimes Windows 10 doesn't want to show this, either because a user has turned it off, or for other less clear reasons. In that case we recommend using the small notification window described below.
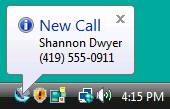
If you're using an older version of Windows, you may see the classic Windows popup balloon:
The notification will not appear if Minimize to notification tray is selected but Ascendis Caller ID is not minimized when the call arrives. Also, if Minimize to notification tray is selected, then Ascendis Caller ID will only allow this or Bring to top when phone rings to be selected, not both. If this option is disabled even when Minimize to notification tray or Run in tray is selected, then you're running an older version of Windows. Windows XP or newer is required for this feature. |
||
|
|
||
Bring main window to top when phone rings |
Determines whether Ascendis Caller ID will automatically pop up its window when the phone rings. Ascendis Caller ID will appear in front of whatever you were working on, so you may find this distracting. However, this will let you see who is calling without having to manually switch to the Caller ID program. If Minimize to notification tray is selected, then Ascendis Caller ID will only allow this or Show caller information over notification tray to be selected, not both. |
||
|
Causes Ascendis Caller ID to minimize itself after the specified number of seconds after a call comes in. If a modal window (such as Options, Edit Contact, etc.) is displayed then this is ignored. |
||
|
|
||
Open separate call display window for each call |
Determines whether Ascendis Caller ID should open separate windows for each incoming phone call. This may be useful for busy multi-line situations. |
||
|
Causes Ascendis Caller ID to close the call display window after the specified time has elapsed. |
||
|
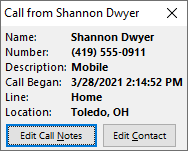
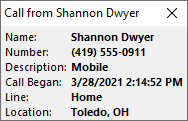
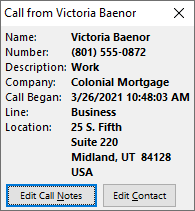
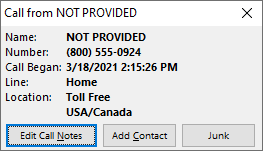
Generates a rather small window containing varying amounts of the caller's information depending on whether the caller is a known contact:
The buttons at the bottom of the window can be disabled to make the window smaller. See "Show edit/add/junk buttons", below.
Right-click in the window to copy the caller's name, number, address, or all displayed data, to change the font, background color, or transparency, or to hide or show the buttons. |
||
|
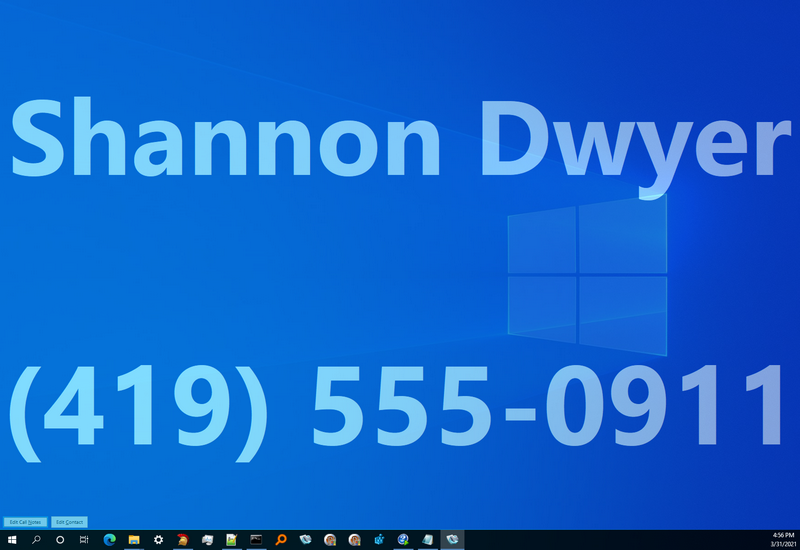
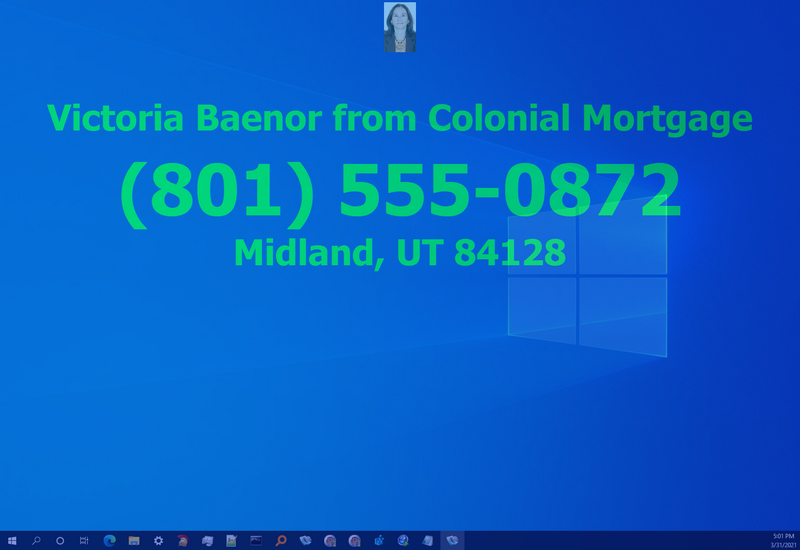
Creates a window that, by default, occupies the whole screen. The window displays the caller's name and phone number:
The large size makes the caller information readable from a fair distance. The window's size and position can be customized by adjusting the size and position while the window is displayed. The background color and fonts can be customized by right-clicking on the window. The font size will be reduced if needed to fit the window.
By default, the window is displayed at 50% transparency so you can see what's running behind it. You can change the transparency by right-clicking on the window and choosing "Transparency...".
Right-click in the window to copy the caller's name, number, address, or all displayed data, to change the font, background color, or transparency, or to hide or show the buttons. |
||
Creates a window from a configurable HTML layout. By default, the window includes the caller's picture and address for known contacts:
The window's size and position can be customized by adjusting the size and position while the window is displayed. The background color, fonts, and transparency can be customized by right-clicking on the window.
You can also choose a different layout from the right-click menu, under "Standard Layouts" or "Custom Layouts". You can edit a standard layout by choosing "Edit Layout" and it will appear under the "Custom Layouts" menu. Editing the layout requires knowledge of HTML and DWS. This is the same language used by the Display Panel.
While this window looks similar to the Large/adjustable window above, it includes more information by default and allows custom layouts. However, it does not automatically adjust the font sizes to fit. You can change the base font size using the right-click menu, and you can adjust relative font sizes for specific elements by editing the layout.
Right-click in the window to copy the caller's name, number, address, or all displayed data, to change the font, background color, or transparency, or to hide or show the buttons. From the same menu you can also choose from some standard layouts or make your own. |
|||
|
Click this button to see what the notification would look like for the call currently selected in the Calls list. (If no call is selected, the first call in the list will appear. If the Calls list is empty, a dummy call will be added.) |
||
|
Determines whether the "Edit Call Notes", "Edit Contact" (or "Add Contact"), and "Junk" (or "Unjunk") buttons are present in the notification window. The buttons are convenient but make the small notification window bigger. Note that "Junk" or "Unjunk" are only shown when appropriate. |
||
|
Determines whether Ascendis Caller ID will position the small window automatically so that it doesn't overlap any other small notification windows. Otherwise the small window is always put in the same place, which can be adjusted manually (by moving a displayed notification window).
This has no effect on the large and HTML notification windows. |
||
|
|
||
Causes Ascendis Caller ID to open the contact window corresponding to the new call. If the caller is not already in the contact list, it is added. |
|||
|
When checked, Ascendis Caller ID will only open the contact window when a caller in the contact list calls. When not checked, Ascendis Caller ID will open the contact window for all calls. |
||
|
Specifies which of the tabs in the Contact window should be visible when the window is opened. "1" corresponds to the first tab, "2" to the second tab, and so on. |
||
|
|
||
Open call window for each call |
Causes Ascendis Caller ID to open the call window for the new call. This is convenient if you take call notes for most calls. |
||
|
|
||
Stop screen saver when phone rings |
Determines whether Ascendis Caller ID will attempt to stop the active screen saver when the phone rings. This may make more CPU time available to Ascendis Caller ID for playing sounds, speech, and other processing. |
||
Wake up monitor when phone rings |
Causes Ascendis Caller ID to try to switch the monitor out of power saving mode when the phone rings. |
The OK button saves any changes you made to the settings and closes the window. The Cancel button closes the window without saving changes. The Help button brings up this topic in the help file.
| Send comments or questions about web site to webmaster@ascendis.com |
Modified January 17, 2024, 3:47 pm
|